A humidifier works best when its filter is clean and functioning properly. Over time, however, the filter collects dust, minerals, and other impurities, which gradually reduce its efficiency.
That’s why replacing your humidifier filter on time is not just a matter of maintenance—it’s essential for keeping your indoor air fresh, healthy, and free of irritants.
Still, many users often wonder: How do you change the filter without hassle? And how often should it really be replaced?
In the guide below, we’ll walk you through the exact steps to replace your humidifier filter easily and explain the right replacement schedule, so you can enjoy cleaner air and extend the life of your device.
How to Replace Humidifier Filter?
Filters (often called wicks, pads, or cartridges) are critical because they trap dust, minerals, and impurities before the moisture is released into the air. A clogged or old filter not only reduces efficiency but can also harbor bacteria and mold, which lowers indoor air quality.
Changing your humidifier filter may sound tricky if you’re doing it for the first time—but don’t worry, it’s actually very straightforward.
You don’t need advanced tools or mechanical expertise, and in most cases, it takes just a few minutes. Think of it as being no more complicated than swapping out batteries in your TV remote.
Whether you own a portable tabletop humidifier, a large console unit, or a whole-house furnace humidifier, the replacement steps are generally similar, but with some model-specific differences.
Step-by-Step Replacement Process
Step 1: Turn off and unplug the unit
Always start with safety. Shut off the humidifier and unplug it from the outlet before opening any compartment.
If you are working with a furnace-mounted whole-house humidifier, make sure to also switch off the HVAC system and close the water supply valve before proceeding.
This prevents accidental electrical contact or water leaks during the process.
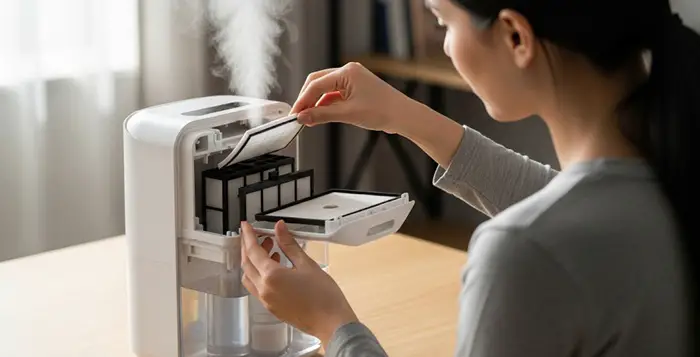
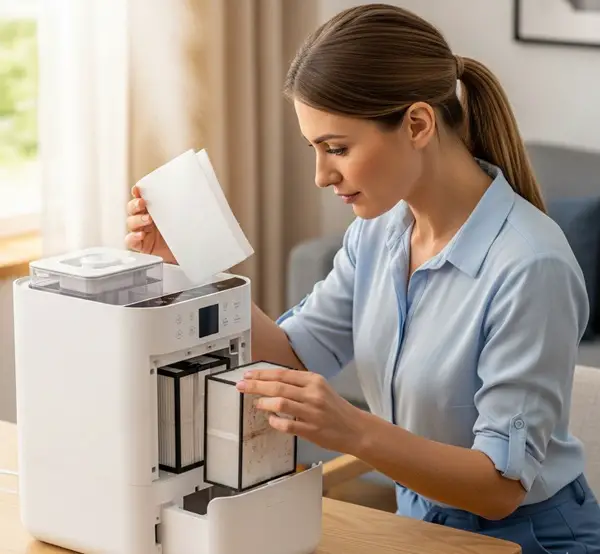
Step 2: Access the filter compartment
Next, open the section where the filter is housed. In portable or tabletop humidifiers (like Vicks, Honeywell, or Crane models), this usually involves removing the water tank, after which the filter housing or tray is exposed and can be lifted out easily.
In console humidifiers, which are larger floor-standing units, you may need to open a bigger front or side panel since they often use multiple wick filters.
For furnace or whole-house humidifiers, the filter—commonly referred to as a water panel or evaporator pad—is found inside a metal or plastic frame, typically behind a service panel that may be secured with clips or screws.
Step 3: Remove the old filter
Once you have access, carefully slide out the old filter. Take a moment to inspect it.
If it shows brown discoloration, heavy mineral scaling, a musty odor, or sagging material, you’ll see exactly why timely replacement is so important.
In furnace models, hard water scaling is especially common and can severely restrict both airflow and water absorption, reducing the unit’s efficiency.
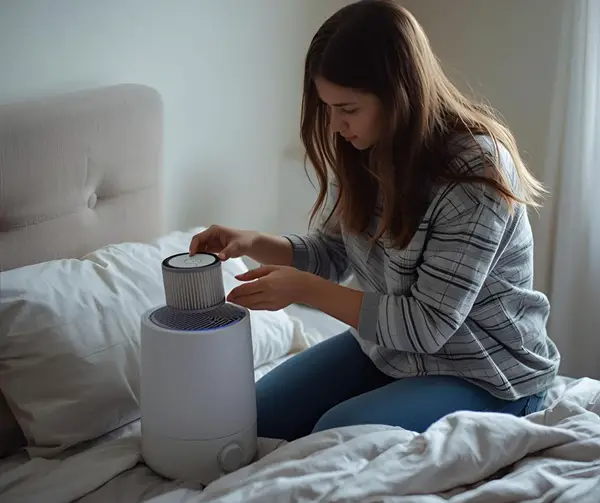
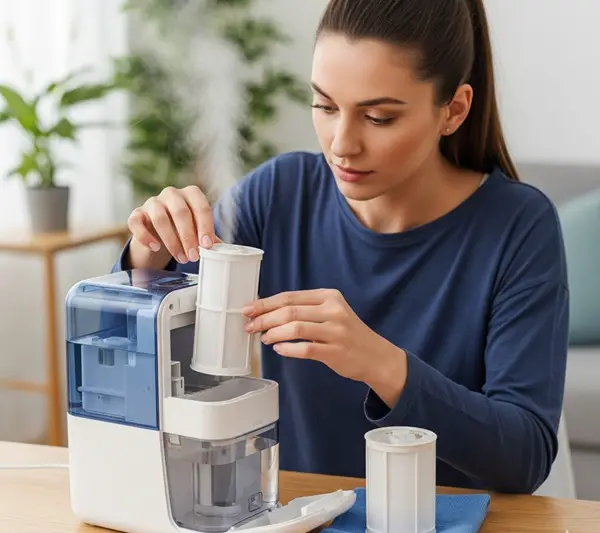
Step 4: Prepare and insert the new filter
Now take your replacement filter and prepare it according to the manufacturer’s instructions.
Many wick filters used in portable or console humidifiers should be pre-soaked in cool water for a minute or two, which allows them to wick moisture efficiently from the start.
Once ready, insert the filter in the same orientation as the old one—most filters will have arrows, grooves, or markings to guide you.
Furnace humidifiers use water panels that must be slid into their plastic frame properly, with the water distribution tray at the top aligned correctly.
Be sure to check the “UP” or “TOP” marking on the filter so that water flows in the correct direction.
Step 5: Reassemble and restart your unit
After the new filter is securely in place, close the cover or panel carefully.
For portable or console humidifiers, refill the water tank with clean, preferably distilled water, and place it back onto the base.
For furnace humidifiers, reopen the water supply valve and switch the HVAC system back on. Once everything is assembled, plug the humidifier back in and start it up.
You should notice smooth airflow, proper water absorption, and improved humidity output almost immediately.
If you need to buy your replacement filters online, here are a few options that might suit your requirements:
- Humidifier Wicking Filters (Compatible with Honeywell Tower Humidifiers)
- Humidifier Filter Replacement for AprilAire Whole-House Humidifiers
- Humidifier Filters for Vicks, Honeywell, Kaz, Sunbeam, etc.
- Humidifier Replacement Filters for Top Fill LEVOIT Humidifiers
Why Timely Filter Change Matters So Much?
Running a cool-mist humidifier without a good filter or not changing your humidifier filter on time can carry several associated risks to you and your climate control system.
It makes you sick
When filters are not replaced on time, the trapped particles remain damp—creating the perfect breeding ground for mold and bacteria.
This problem becomes even worse during the summer and spring months, when pollen and mold counts are naturally high. Instead of improving your indoor air quality, a neglected humidifier can quickly become clogged with dirt, dust, and pollen, reducing its effectiveness.
The most concerning part is that an unmaintained humidifier doesn’t just stop working well—it can actually spread harmful contaminants into the air, making you feel even sicker instead of healthier.
It can damage the motor of the unit
Moreover, when the filters become clogged, the motor of your humidifier is forced to work harder, putting extra strain on the unit. This not only reduces its overall efficiency but also increases the risk of mechanical failure and, in severe cases, complete breakdown of the device.
One of the first signs you’ll notice is reduced performance—the unit won’t humidify the air as effectively, leaving your home less comfortable. Over time, neglecting timely filter changes can turn into costly repairs or the need for a replacement.
How Often Do You Need to Change a Humidifier Filter?
Most of the humidifier manufacturers recommend changing their humidifier filters after 2-3 months if you are using your device regularly.
But the time of replacement of the humidifier filter wick depends on the period of use of the unit, as well as the quality of the water you use.
1- Water Quality – Hard water or tap water with minerals can clog filters quickly, often requiring changes every 2–4 weeks. Using distilled water helps extend filter life.
2- Type of Filter – Disposable filters usually need replacement every 2–4 weeks, while reusable filters should be cleaned weekly or monthly, depending on use. Always follow the manufacturer’s instructions.
3- Air Quality – Dust, smoke, pets, or allergens in your home shorten filter life. In clean environments, filters may last up to a year, but in polluted or allergen-prone homes, more frequent changes are necessary.
4- Frequency of Use – The more often you run your humidifier, the faster the filter clogs. Occasional users may only need yearly changes, while daily users may need replacements every 1–2 months.
5- Type of Humidifier – Filter replacement frequency also varies by model.
| Type of Humidifier | How It Works | Filter Requirement | Replacement Frequency |
|---|---|---|---|
| Console Humidifier | Large unit for whole-room; runs longer with bigger tank | Yes – large filters | Every 3–6 months |
| Personal / Tabletop Humidifier | Small, portable unit with limited capacity | Yes – small filters | Every 1–2 months |
| Evaporative Humidifier | Uses a wicking filter to absorb water; fan blows moisture into the air | Yes – wicking filter | Every 2–4 weeks |
| Ultrasonic Humidifier | Uses high-frequency vibration to turn water into mist | No filter required | None (but needs regular cleaning) |
Why don’t ultrasonic humidifiers need filter changes?
Unlike evaporative humidifiers, ultrasonic units don’t pull water through a filter. Instead, they atomize water directly into mist. That’s why:
They don’t rely on filters, so there’s nothing that clogs or needs replacement.
However, if you use hard tap water, these humidifiers can release white dust (fine mineral particles) into the air. To avoid this, it’s best to use distilled or demineralized water.
While they save you the cost of buying filters, they do require regular cleaning to prevent bacteria or mold buildup in the water tank.
How Can You Make Your Humidifier Filters Last a Bit Longer?
Humidifiers take in air from their surrounding atmosphere, add some water content, and send it out as cool or warm mist (depending on the type of humidifier) through an air filter.
To keep your humidifier running smoothly for a long time, you need to check, clean, and replace the filters regularly.
Those of you who do not want to change the filters very often can make your humidifier filters last longer by following a few techniques…
1) Clear the dust
Dust particles present in the air are arrested in the filter, making sure they do not re-enter the room when the mist of humid air is delivered into the environment.
Over time, this accumulated dust clogs the filter making the humidifier work harder to provide an output. Regular dusting of the house can help you greatly to avoid changing your humidifier’s filter frequently.
2) Keep the pets away
No offense, pet lovers, but they shed fur. They have the same effects as dust particles do, which is to clog the humidifier filters after a while.
If possible, restrict the pet’s entry into the room where the humidifier is kept. If not, vacuum cleaning the room every once in a while can help.
3) Clear the smoke particles
Smoke particles can also be considered a cause of concern, especially if you regularly smoke inside the house.
Before smoking, make it a routine to step out of the house (or at least away from the humidifier unit). Running exhaust fans to carry smoke out of the house could be beneficial, too.
4) Check the water quality
Hard water mineral deposits could also pose a problem unless water to the humidifier is from a freshwater tank or a water filtering system. Usage of distilled water in your humidifier device is hence advised, albeit expensive.
Also, remember to rinse and wipe the humidifier tank to stop mold, bacteria, and dirt from reaching the filter.
5) Dry the filter between uses
When a humidifier filter stays damp for long periods, it creates the perfect environment for mold, mildew, and bacteria to grow. This not only shortens the life of the filter but also risks spreading harmful particles into the air you breathe.
By removing the filter after use and allowing it to air-dry completely, you break the moisture cycle that encourages microbial growth. A dry filter lasts longer, stays fresher, and keeps your humidifier working more hygienically.

Buying the Best Filter—and Knowing When It’s Time for a New Humidifier
When you purchase a new humidifier, it usually comes with an original filter provided by the manufacturer.
These are designed to fit perfectly and deliver the best performance for your specific model. If you ever need a replacement, it’s always wise to buy a filter that matches the exact brand and model of your unit. This ensures a proper fit and keeps your humidifier working at its best.
Today, many filters also come with antimicrobial protection that prevents mold, algae, and bacterial growth on the filter surface. Choosing these advanced filters not only extends the life of your humidifier but also safeguards your family’s health.
If you’d rather avoid the hassle of filter replacements altogether, you may want to consider investing in a filterless humidifier. These advanced models are designed for convenience, offering clean, risk-free operation without the recurring cost of replacement filters.
Some modern evaporative cool mist humidifiers even include automatic filter check indicators. These smart features monitor the filter’s condition and notify you exactly when it needs replacing—removing the guesswork and making maintenance simple.
When is it time to say goodbye to your old humidifier?
Just like any other appliance, a humidifier has a limited lifespan. Over time, even with proper cleaning, you may notice stubborn mineral deposits, stains, or scaling that simply won’t go away.
When this happens, performance drops, and the unit may no longer deliver the humidity levels you need. That’s your cue—it’s time to replace it.
Remember, the ideal indoor humidity level is between 30% and 50%. Anything above this can encourage mold, mildew, and bacterial growth, putting your family’s health at risk.
If your current unit struggles to maintain this range, upgrading to a newer model is the best solution.
When buying a replacement, look for a humidifier with a built-in humidistat. This handy feature automatically regulates the moisture level in your home, ensuring a comfortable and safe environment year-round without constant monitoring.
Overall, by choosing the right filter—and knowing when it’s smarter to upgrade the entire unit—you’ll enjoy healthier air, improved comfort, and peace of mind. With proper care, your humidifier won’t just be a machine in your home—it will be a long-term partner in your family’s well-being.
Meen Smith is a nurse by profession who loves writing online, spending time with her family and caring for the elderly. She has already worked as an associate editor on various moms, babies, home appliances, kitchen, and healthy living blogs. In her spare time, she also enjoys drawing, reading/writing kindle eBooks and improving her skills a bit.